FREE SHIPPING Anywhere in the Country for Repairs
 It’s 7:00am on Monday morning. The endo suite is filling up with patients. Your flexible scopes are going to get a workout today. They start the day in good shape, but will they end up that way at 4:00pm? How is it they can be so susceptible to damage throughout the workday? Is there something you can do to prevent it?
Below are real-life, practical, easy-to-apply inspection techniques you can use throughout your work day to reduce scope downtime. Anyone who handles an endoscope can take these steps to help extend the life of a scope. These assessments are relatively quick (they can even be done on the way to the procedure room) and can help reduce the amount of repair a scope goes through in its lifetime.
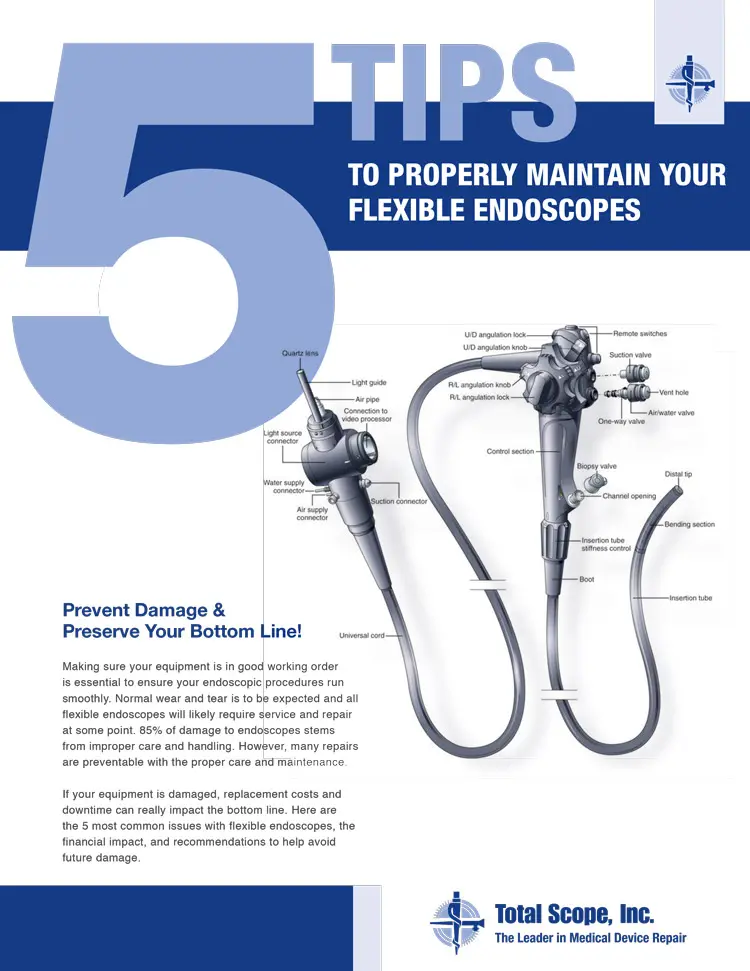
We’ll discuss the major sections of a flexible endoscope and describe what you can do to help them function better and longer in your suite.
Another good way to save yourself headaches is to thoroughly clean your scopes after every use. Click here to learn our 7 steps to disinfecting your scopes.
The Light Guide Connector (LGC)
You can quickly assess the light guide connector. The entire unit can be visually examined for cracks or fractures. Be aware that even though this is a sturdy component of the endoscope, the user should be careful not to bump or bang the light guide connector during transport. If the LGC does take a hit, it’s possible that components inside have been damaged, even if it looks okay on the outside.
Next, take a look at any of the components that protrude from the scope. Make sure nothing looks out of the ordinary (no parts missing, bent, or distorted in any way). This quick check can prevent problems that may arise after the scope is already in a procedure. For example, if you are using a colonoscope and the suction port is damaged or loose, you may experience poor suction during the procedure.
Checking the Light Post
The final section on the LGC to check quickly is the light post. This post plugs into the processor, which allows for light and air to pass through the scope during the procedure. Make sure the post isn’t bent, otherwise it may not plug into the processor properly.
Also, the tip of the light post has a lens that can crack. If the lens cracks, it could leak or hinder the amount of light that shines through the scope. The crack could look like a clean fracture or it may have a “spider web” effect.
The amount of light that gets through the scope is obviously very important during the procedure. Here’s a quick test to ensure the light fibers at the light post are in good working order. Take the distal tip (the section of the scope that is first inserted into the patient) and hold it up to the light. While the light is shining through the light lens at the distal tip (we’ll talk more about the distal tip later), you can check the light lens at the light post for brightness.
Sometimes you can see broken fibers through the lens. If the light shining through the light post lens doesn’t seem quite right, you should check the lights on the scope before starting a procedure to ensure there will be enough light to view during the procedure.
The Universal Cord and Insertion Tube
The universal cord and the insertion tube serve distinct functions during a procedure, but they both require the same attention when caring for the scope. During transport, it is important to keep the scope looped, and not bent or kinked. When these sections bend too far or they are kinked, they get damaged. The problem can be minor or it could lead to major damage by injuring components found beneath both the universal cord and the insertion tube. For example, it is not uncommon to find that the air water channel in the universal cord, or the forcep channel in the insertion tube, is kinked in the exact spot that the universal cord or insertion tube itself is kinked. Also, a severe kink can cause a cut or a hole in the universal cord or forcep channel and leave the scope susceptible to fluid invasion.
One of the most important things to remember when caring for the universal cord and insertion tube is when you clean the scope. Keep sharp objects and instrumentation away from these sections during manual cleaning and disinfecting. Sharp objects can puncture, cut or tear both the universal cord and the insertion tube, and these types of damage can lead to major repairs.
Also, please be mindful that a bite-block should be used any time a flexible scope is used down a patient’s throat. Extensive damage to the insertion tube can occur if a patient bites down on the scope during a procedure.
The Control Handle
As with the light guide connector, the control handle is a very strong section of equipment. However, it too can experience a number of external defects that you can see during a quick assessment. If the scope gets dropped, take a quick look at the entire control handle to ensure it hasn’t sustained any cracks or fractures. If the scope does get cracked, it should be removed from use and pressure-tested to ensure that there aren’t any leaks in the scope. This precaution can prevent major fluid invasion problems.
The rubber buttons that sit on top of the control handle can get damaged in a number of ways. The buttons can get cut, cracked, torn, or simply come off over time. Run your fingers over the buttons to make sure they are in good working order. If the buttons don’t seem quite right, you might be susceptible to fluid invasion, so the scope should be removed from use and checked out thoroughly.
The Angulation Knobs
The angulation knobs are another key section to review. Make sure that when you manipulate the angulation dials there is a response at the distal tip. Check the dials to make sure they are not loose. Ensure that the scope angulates well enough to meet the manufacturer’s specifications, or at least well enough to meet your doctor’s needs.
Also, be aware of the freeze knobs associated with each angulation dial. The freeze knobs can lock the angulation knobs in place fairly easily. Sometimes this can happen without the user even knowing it (a bump or a caught sleeve can engage them). If this occurs, and the angulation dials are manipulated, the angulation cables can be damaged as they try to move while locked. So, before a procedure, make sure that the freeze knobs are in the “free” position.
Finally, the control handle has a few ports you should inspect to ensure they are not sharp or loose. A visual and a hands-on check will ensure there aren’t any sharp edges on the scope and that none of the ports have been jarred loose from normal wear and tear or physical trauma. Running your fingers over the ports will allow you to identify potential damage.
The Distal Tip
It is important to pay particular attention to the distal tip for several reasons. First, check the bending rubber for scrapes, cuts, and/or tears much in the same way as you did the universal cord and insertion tube. The difference here is that the bending rubber is a very thin piece of rubber that is much more susceptible to damage.
Be aware that even a slight hole in the bending rubber can lead to damage under the rubber and to fluid invasion throughout the scope. When checking the bending rubber, firmly run your hands over the rubber. It should feel tight to the bending section and not move easily with your fingers. If it moves with your fingers, the bending rubber could get caught on instrumentation or inside of a patient during a procedure (especially if the bending rubber isn’t lubricated well enough). The bending rubber should be tight and smooth. If for any reason the bending rubber doesn’t feel quite right, it’s a good idea to remove the scope from use.
The Distal Tip
The other major section to note here is the distal tip itself. First, we’ll discuss the distal cap (a.k.a. distal hood). This cap is usually made of plastic. Keep in mind that the cap can crack or chip from trauma or from normal wear and tear. Nicks are common on the cap, but be aware that sometimes these nicks or chips can be sharp and could injure a patient. When visually checking the cap for damage, it’s a good idea to run your fingers over it to make sure it’s smooth. Also, make sure the cap is secured firmly to the bending section, since the cap can become loose over time.
At the tip of the cap sit a few lenses. These lenses are where the lights and the image come through the scope. Check the lenses to make sure there aren’t any cracks. The cracks may be solid fractures or they may have a “spider web” effect, much in the same way that the light post lens could be damaged. In either case, the scope should not be used if cracks are present.
The test that was done to check the light fibers on the light post of the light guide connector can also work here. Take the light guide connector and hold it to any light to allow light to pass through the light post. You should see light shining through the light lenses on the distal cap. If they appear dim, you should test the lights prior to using the scope in a procedure.
A Note About Air Nozzles
Also note that on many flexible endoscopes, an air/water nozzle sits on the distal cap. This nozzle can experience trauma if the scope is not properly handled (e.g. the distal tip was scraped on the floor or perhaps closed in a drawer).
The nozzle has an opening that faces the objective lens (the lens that projects the image to a video screen). If the nozzle looks like it has collapsed or if it seems to be closed shut, remove the scope from use and get it checked. It’s also a good idea to test the air/water before a procedure to ensure there is adequate flow. If a clog exists, don’t try to dislodge it with a needle. Using a needle can create sharp edges around the nozzle, which could potentially harm the patient during a procedure.